
CDK Pipeline for ECS hosted NextJS App
In this demo we will explore and see how to use two different, but complementary techniques:
- Using CDK Pipelines to deploy a Stack
- Deploying a NextJS application to an ECS Fargate container
In each of these examples, we will look at several different mechanisms to provide security and scaling. This blog has been converted to using this method of hosting.
GitHub Repo
https://github.com/schuettc/cdk-pipeline-ecs-hosted-nextjs
CDK Pipeline
flowchart LR
    Git[Git repository]
    CodeStar[AWS<br/>CodeStar]
    Pipeline[AWS<br/>CodePipeline]
    CodeBuild[AWS<br/>CodeBuild]
    PipelineStack[Pipeline<br/>Stack]
    NextStack[NextJS App<br/>Stack]

    Git --> CodeStar
    CodeStar --> Pipeline
    Pipeline --> PipelineStack
    Pipeline --> CodeBuild
    CodeBuild --> NextStack

    style Git fill:#2088FF,color:#fff
    style CodeStar fill:#232F3E,color:#fff
    style Pipeline fill:#232F3E,color:#fff
    style CodeBuild fill:#232F3E,color:#fff
    style PipelineStack fill:#C7131F,color:#fff
    style NextStack fill:#C7131F,color:#fff
This demo uses AWS CodeStar Connections to create a link to a GitHub repo. This will allow us to use GitHub commits to push changes to our NextJS App through the CDK Pipeline.
The cdk-pipeline-ecs-hosted-nextjs.ts file will create a Stack with a self-mutating CodePipeline. This is the Pipeline contains a Stage that will deploy the the NextJSApp Stack. This Pipeline is triggered by the GitHub repo and branch associated.
const pipeline = new CodePipeline(this, "Pipeline", {
  synth: new CodeBuildStep("Synth", {
    input: CodePipelineSource.connection(props.githubRepo, props.githubBranch, {
      connectionArn: props.connectionArn,
    }),
    commands: ["yarn install --frozen-lockfile", "yarn build", "npx cdk synth"],
    rolePolicyStatements: [
      new PolicyStatement({
        actions: ["sts:AssumeRole"],
        resources: ["*"],
        conditions: {
          StringEquals: {
            "iam:ResourceTag/aws-cdk:bootstrap-role": "lookup",
          },
        },
      }),
    ],
  }),
  selfMutation: true,
  dockerEnabledForSynth: true,
});

pipeline.addStage(
  new NextJSAppStage(this, "NextJSApp", props as NextJSAppProps),
);
NextJS App
flowchart LR
    R53[Amazon<br/>Route 53]
    CF[Amazon<br/>CloudFront]

    subgraph VPC[Virtual Private Cloud]
        subgraph Public[Public Subnet]
            subgraph SG[Security Group]
                ALB[Application<br/>Load Balancer]
                AS[Auto Scaling]
                Fargate[AWS Fargate]
            end
        end
    end

    R53 --> CF
    CF --> ALB
    ALB --> AS
    AS --> Fargate

    style R53 fill:#8C4FFF,color:#fff
    style CF fill:#8C4FFF,color:#fff
    style ALB fill:#8C4FFF,color:#fff
    style AS fill:#FF9900,color:#fff
    style Fargate fill:#FF9900,color:#fff

    style VPC fill:#E9F3E6,stroke:#248814,stroke-width:2px
    style Public fill:#E9F3E6,stroke:#248814,stroke-width:2px
    style SG fill:#E9F3E6,stroke:#C7131F,stroke-width:2px
The demo optionally uses a pre-configured Route 53 Hosted Zone domain. Otherwise the traffic will route through the following services:
- Route 53 (Optional)
- Cloudfront
- Application Load Balancer
- Fargate with Auto Scaling Group
Securing Traffic
In order to ensure that traffic uses this path, we will establish the follow security mechanisms.
Fargate
const fargateTargetGroup = new ApplicationTargetGroup(
  this,
  "nextJsAppTargetGroup",
  {
    vpc: props.vpc,
    port: 3000,
    protocol: ApplicationProtocol.HTTP,
    targets: [this.fargateService],
    healthCheck: {
      path: "/",
      protocol: Protocol.HTTP,
      port: "3000",
    },
  },
);
When configuring the ApplicationTargetGroup that points to the Fargate application, a Security Group will be created that allows traffic from the Application Load Balancer to access the Fargate task.
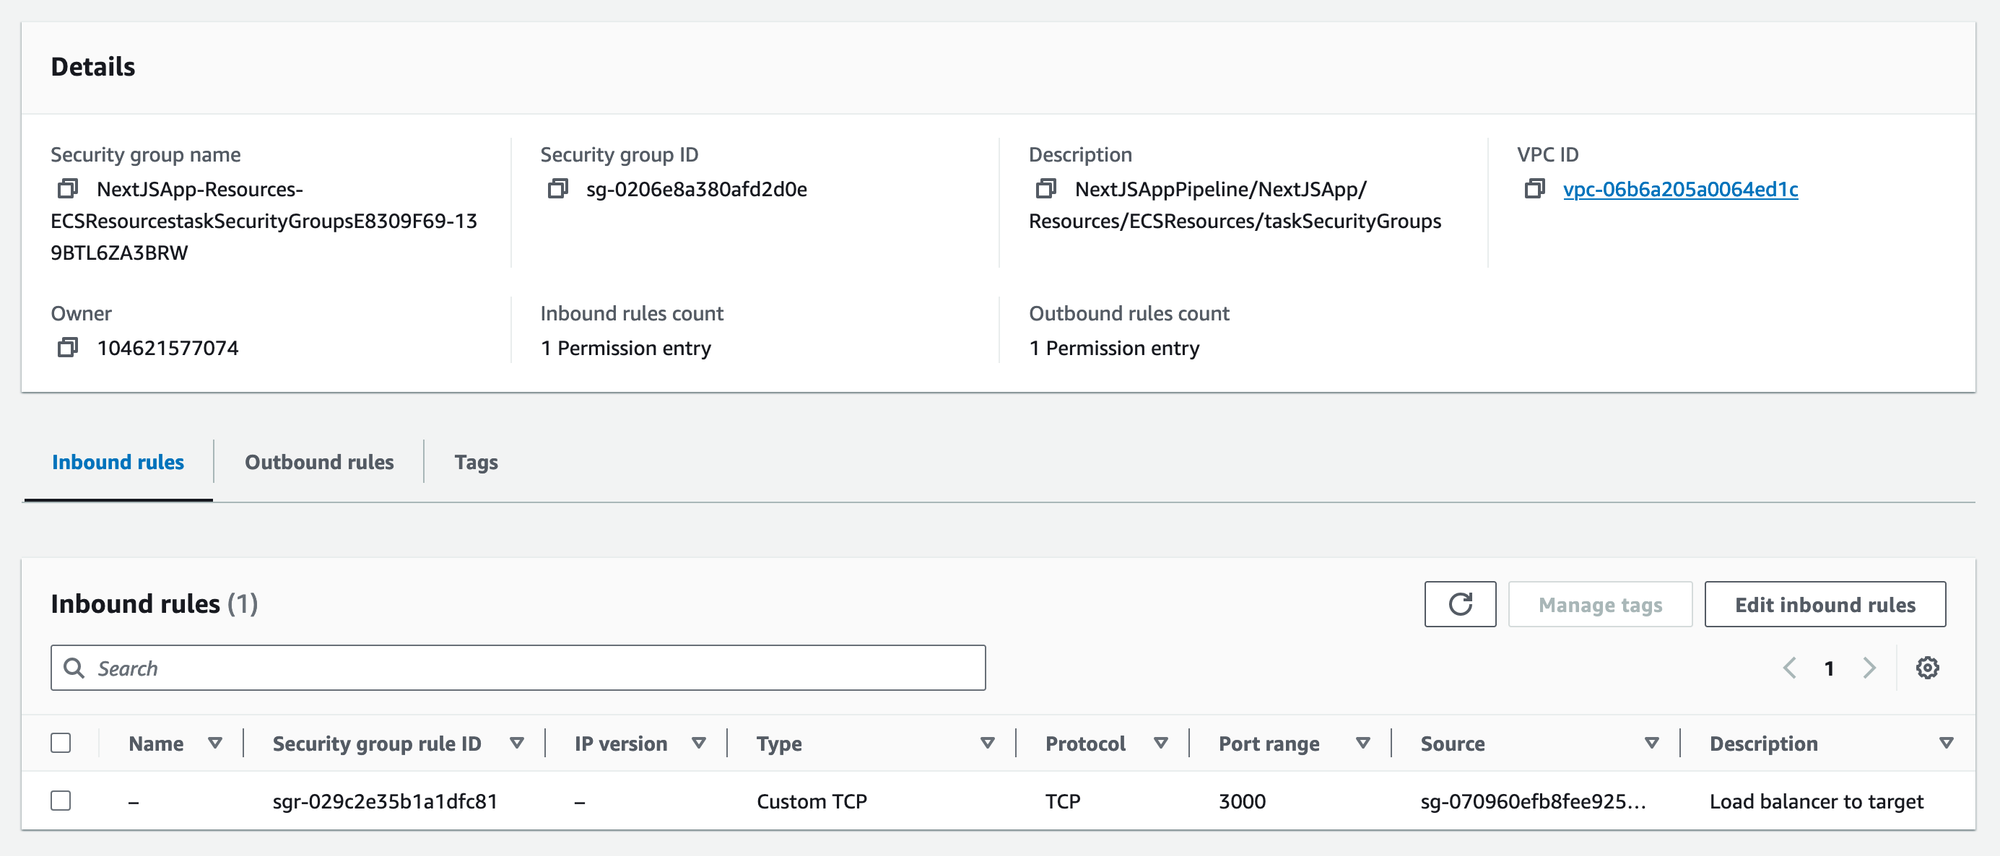
This Security Group will use the Security Group of the Application Load Balancer.
Application Load Balancer
this.applicationLoadBalancerSecurityGroup.addIngressRule(
  Peer.anyIpv4(),
  Port.tcp(80),
);
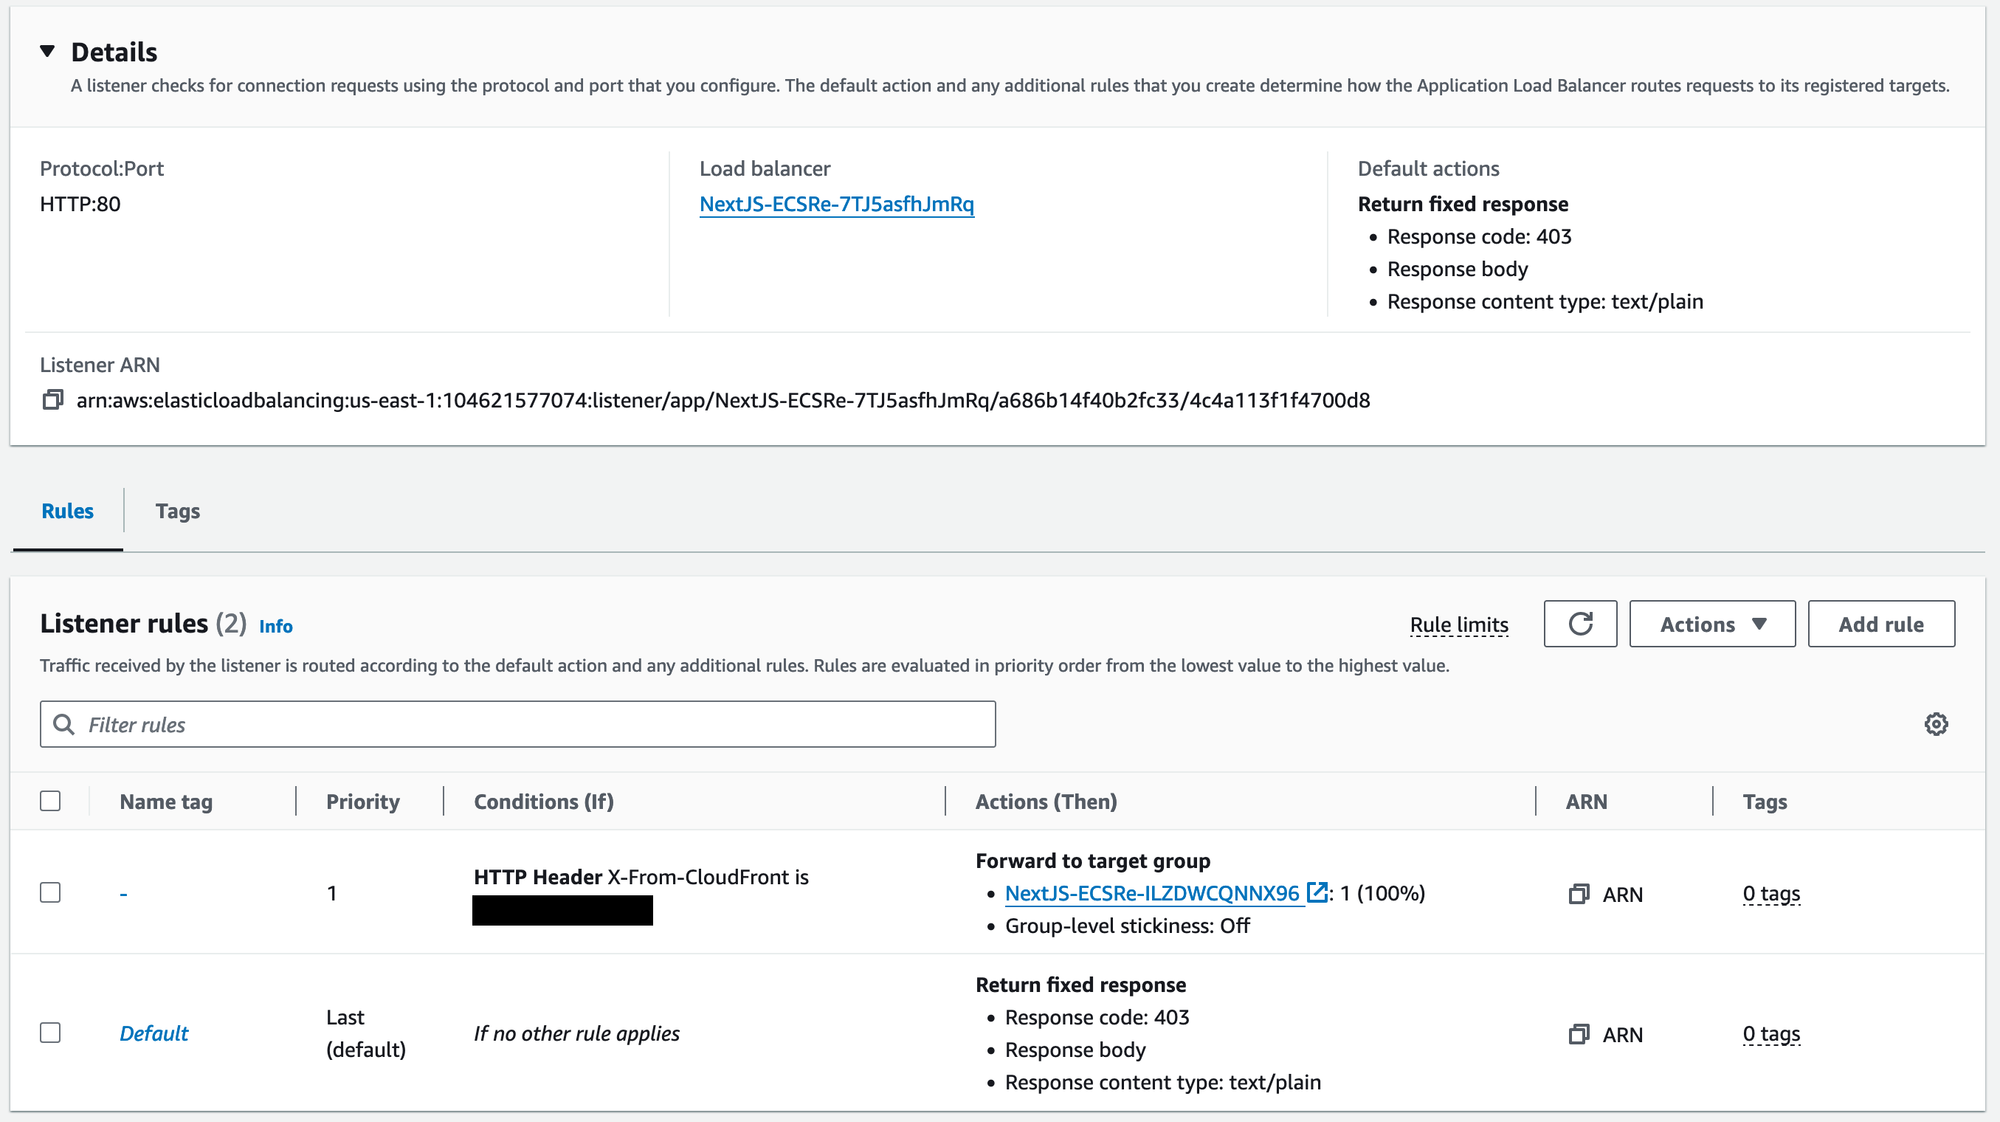
This Security Group will allow traffic in from any IPv4 address on TCP Port 80. In order to ensure that traffic from sources besides Cloudfront are rejected, we will use a configuration of the Listener.
const fargateListener = this.applicationLoadBalancer.addListener(
  "fargateListener",
  {
    port: 80,
    protocol: ApplicationProtocol.HTTP,
    open: true,
    defaultAction: ListenerAction.fixedResponse(403),
  },
);

fargateListener.addAction("ForwardFromCloudFront", {
  action: ListenerAction.forward([fargateTargetGroup]),
  conditions: [
    ListenerCondition.httpHeader(props.customHeader, [props.randomString]),
  ],
  priority: 1,
});
This Listener will by default reject all traffic that is sent to it. An additional action will be used to allow traffic with a specific header and value to forward to the Fargate application. This information is created separately and configured during deployment. For more information on this mechanism, see building-a-websocket-server-with-fargate-and-cdk.
The result:
Cloudfront
this.distribution = new Distribution(this, "CloudfrontDistribution", {
  minimumProtocolVersion: SecurityPolicyProtocol.TLS_V1_2_2021,
  defaultBehavior: {
    origin: new LoadBalancerV2Origin(props.applicationLoadBalancer, {
      httpPort: 80,
      protocolPolicy: OriginProtocolPolicy.HTTP_ONLY,
      originId: "default-origin",
    }),
    viewerProtocolPolicy: ViewerProtocolPolicy.REDIRECT_TO_HTTPS,
    cachePolicy: CachePolicy.CACHING_DISABLED,
    allowedMethods: AllowedMethods.ALLOW_GET_HEAD_OPTIONS,
    originRequestPolicy: OriginRequestPolicy.ALL_VIEWER,
  },
  domainNames: props.domainName ? [props.domainName] : undefined,
  certificate: certificate,
  priceClass: PriceClass.PRICE_CLASS_100,
});
The Distribution created includes a domain and SSL certificate to provide HTTPS access to the Fargate task. Requests to HTTP will redirect to HTTPS.
Domain (optional)
if (props.domainName) {
  hostedZone = HostedZone.fromLookup(this, "HostedZone", {
    domainName: props.domainName,
  });

  certificate = new Certificate(this, "Certificate", {
    domainName: props.domainName,
    validation: CertificateValidation.fromDns(hostedZone),
  });
}

if (hostedZone && props.domainName) {
  new AaaaRecord(this, "mainAaaaRecord", {
    zone: hostedZone,
    target: RecordTarget.fromAlias(new CloudFrontTarget(this.distribution)),
  });

  new ARecord(this, "mainARecord", {
    zone: hostedZone,
    target: RecordTarget.fromAlias(new CloudFrontTarget(this.distribution)),
  });
}
If a domain is included in the deployment, a certificate will be created and used in addition to the default Cloudfront certificate. DNS records will be created associated with this domain.
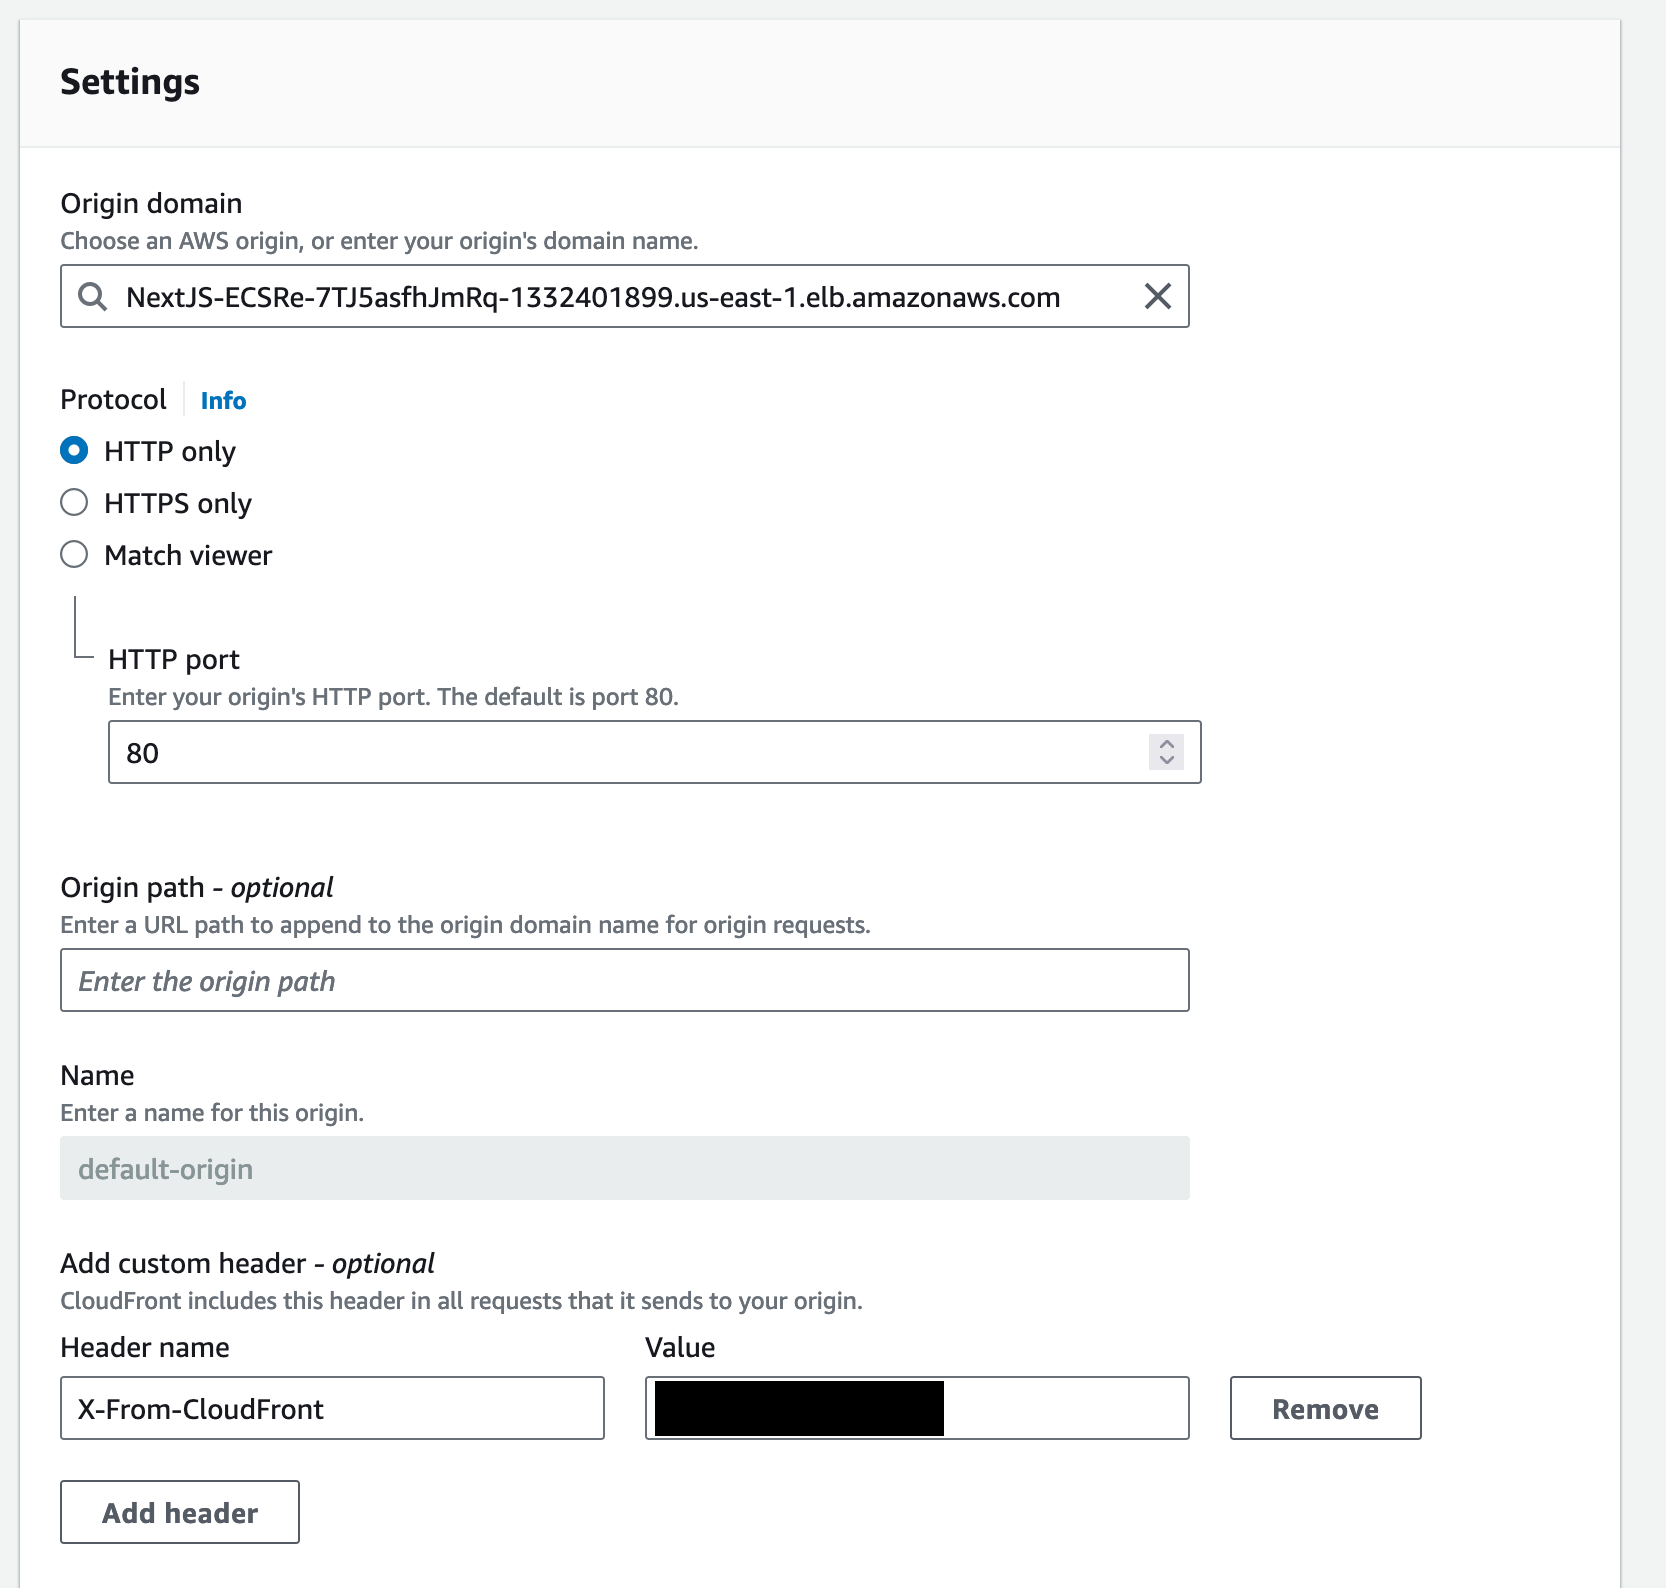
Custom Header
To create the header used to ensure traffic is sourced from Cloudfront, the Cloudfront Distribution Origin will be configured to send it using a Custom Resource.
new CustomResource(this, "customHeaderCustomResource", {
  serviceToken: customHeaderCustomResourceProvider.serviceToken,
  properties: {
    DistributionId: this.distribution.distributionId,
    Origins: [
      {
        OriginId: "default-origin",
        CustomHeaders: [
          {
            HeaderName: props.customHeader,
            HeaderValue: props.randomString,
          },
        ],
      },
    ],
  },
});
The result will look something like this:
Fargate Task
const ecsTask = new FargateTaskDefinition(this, "ecsTask", {
  memoryLimitMiB: 2048,
  cpu: 1024,
  runtimePlatform: {
    operatingSystemFamily: OperatingSystemFamily.LINUX,
    cpuArchitecture: CpuArchitecture.X86_64,
  },
});

ecsTask.addContainer("NextJsContainer", {
  image: ContainerImage.fromAsset("nextjs-docker"),
  containerName: "nextJsApp",
  portMappings: [{ containerPort: 3000, hostPort: 3000 }],
  logging: LogDrivers.awsLogs({
    streamPrefix: "nextJsApp",
  }),
  environment: {},
});

const taskSecurityGroup = new SecurityGroup(this, "taskSecurityGroups", {
  vpc: props.vpc,
});

this.fargateService = new FargateService(this, "nextJsAppFargateService", {
  cluster: cluster,
  taskDefinition: ecsTask,
  assignPublicIp: true,
  desiredCount: 1,
  vpcSubnets: { subnetType: SubnetType.PUBLIC },
  securityGroups: [taskSecurityGroup],
});
The Fargate Service will be configured with a port mapping for port 3000. This corresponds to the Application Load Balancer that forwards traffic to port 3000. The Fargate task will be deployed in the VPC created during the deployment and assigned a public IP address.
The Docker image used is the example shown here: https://github.com/vercel/next.js/tree/canary/examples/with-docker
Result
The result is an Application Load Balancer that will only accept traffic with a specific header and value. This header and value are known only by the deployed Cloudfront Distribution. Traffic with this header will be forwarded to a Fargate task that only allows traffic from the Security Group associated with the Application Load Balancer. This deployment allows us to restrict access to the the Fargate task that uses the Cloudfront Distribution.
Configuration and Deployment
To deploy this repo, you will need to complete the following steps:
- Fork this repo
- Configure Codestar connections with your GitHub repo
- Configure a Hosted Zone in Route 53 with your domain (optional)
- Configure your
.envfile - Deploy
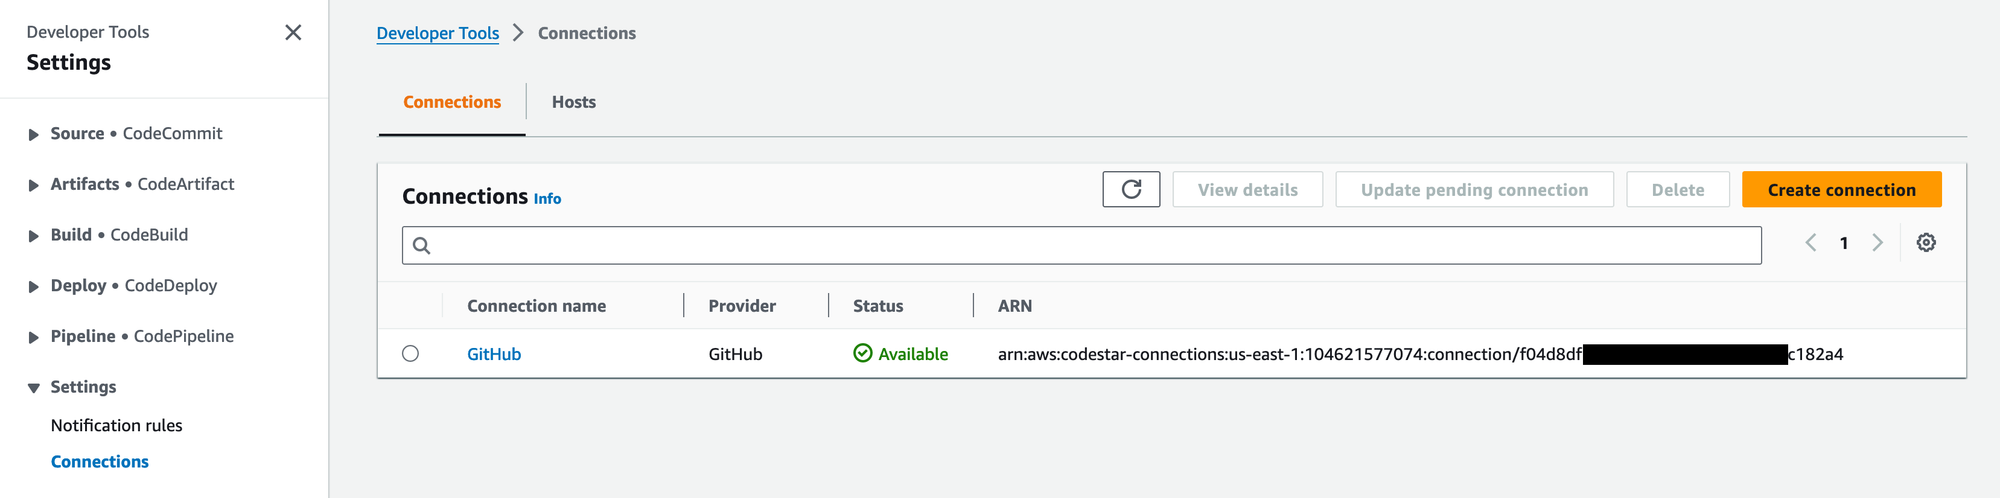
Configure Codestar
To configure your AWS account to support a connection to GitHub, follow the instructions here: https://docs.aws.amazon.com/dtconsole/latest/userguide/connections-create-github.html
The result will look something like this:
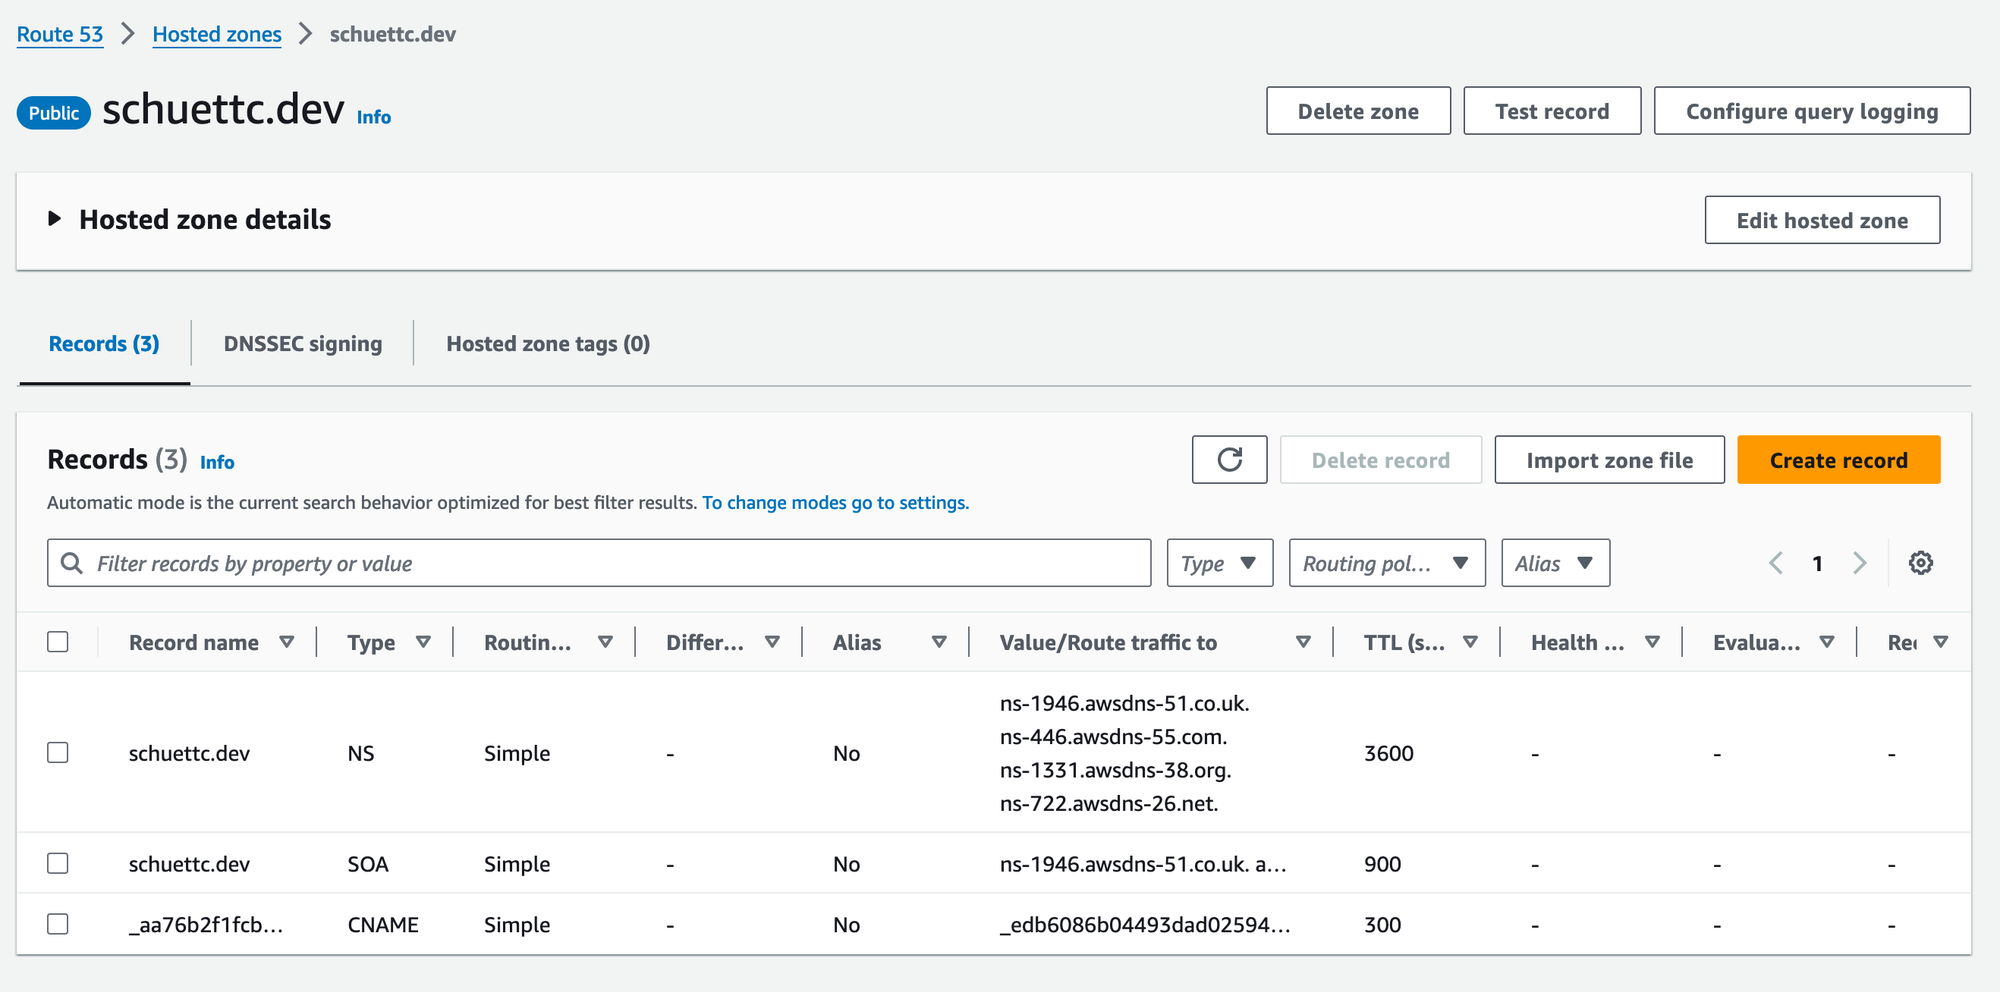
Configure Hosted Zone (optional)
To create a Hosted Zone, follow the instructions here: https://docs.aws.amazon.com/Route53/latest/DeveloperGuide/CreatingHostedZone.html
The result will look something like this:
Configure .env file
Before deploying, you will need to configure a .env file with the following fields:
CONNECTION_ARN=arn:aws:codestar-connections:us-east-1:112233445566:connection/XXXXXXXXXXXXXXXXXXXXXXXX
GITHUB_REPO=XXXXXXXXXXX/cdk-pipeline-ecs-hosted-nextjs
GITHUB_BRANCH=main
DOMAIN_NAME=example.com
DOMAIN_NAME is optional
Deploy
To deploy the Pipeline:
yarn launch
Deploying the Pipeline will begin the process of deploying the NextJSApp stack.