In this demo, we will see how to build an application that will accept streaming audio sent via gRPC and have the audio transcribed using OpenAI Whisper. This demo builds off of the previous gRPC Streaming Audio with Node blog post. However, in this demo, the ECS uses an EC2 based deployment that supports GPUs. This requires several changes to the deployment that will be highlighted.
Overview
flowchart LR
    Mic((Microphone))
    Client[Client]
    ALB[Application Load<br/>Balancer]
    subgraph ECS[ECS EC2 Container]
        G4[g4dn.2xlarge]
    end
    Whisper[Whisper model]

    Mic --> Client
    Client -->|gRPC Audio| ALB
    ALB -->|gRPC Audio| G4
    G4 --> Whisper
    Whisper --> G4
    ALB -->|Transcription<br/>Results| Client

    style ALB fill:#8C4FFF,color:#fff
    style G4 fill:#FF9900,color:#fff
    style ECS fill:#FFE5CC,stroke:#FF9900,stroke-width:2px,stroke-dasharray: 5 5
    style Whisper fill:#569A31,color:#fff
The basic concepts of the previous gRPC Streaming Audio with Node remain largely the same. An audio stream will be generated from a local gRPC client and sent to a gRPC server hosted in Amazon Elastic Container Service (ECS). The server will transcribe the audio and return the results to the gRPC client. While the previous model used a Fargate hosted container, this demo uses an EC2 deployed container in order to use a GPU. Additionally, while the previous model used Amazon Transcribe to provide the Speech To Text processing, this uses Whisper as the ASR and is included in the container that is built and deployed. Because Whisper does not normally support streaming audio, we will have to introduce a chunking mechanism that Whisper can use.
GitHub Repo
https://github.com/schuettc/hosted-whisper-streaming
ECS Deployment
const cluster = new Cluster(this, "cluster", {
  vpc: props.vpc,
});

const launchTemplate = new LaunchTemplate(this, "LaunchTemplate", {
  machineImage: EcsOptimizedImage.amazonLinux2(AmiHardwareType.GPU),
  instanceType: new InstanceType("g4dn.2xlarge"),
  requireImdsv2: true,
  userData: UserData.forLinux(),
  securityGroup: ecsServiceSecurityGroup,
  role: ec2Role,
  blockDevices: [
    {
      deviceName: "/dev/xvda",
      volume: BlockDeviceVolume.ebs(300),
    },
  ],
});

const autoScalingGroup = new AutoScalingGroup(this, "AutoScalingGroup", {
  vpc: props.vpc,
  launchTemplate: launchTemplate,
  desiredCapacity: 1,
  minCapacity: 1,
  maxCapacity: 2,
  vpcSubnets: { subnetType: SubnetType.PUBLIC },
});

const capacityProvider = new AsgCapacityProvider(this, "AsgCapacityProvider", {
  autoScalingGroup,
});

cluster.addAsgCapacityProvider(capacityProvider);
Some changes are required in the CDK to use an EC2 based deployment of ECS. Here we see the Launch Template that defines the EC2 instance parameters. An autoscaling group is also configured to allow this demo to scale up if needed.
const taskDefinition = new Ec2TaskDefinition(this, "taskDefinition", {
  taskRole: hostedWhisperStreamingRole,
  networkMode: NetworkMode.BRIDGE,
});

taskDefinition.addContainer("HostedWhisperStreaming", {
  image: ContainerImage.fromAsset("src/resources/whisperServer"),
  environment: {
    ECS_LOGLEVEL: props.logLevel,
  },
  gpuCount: 1,
  memoryLimitMiB: 31690,
  cpu: 8192,
  portMappings: [{ containerPort: 50051, hostPort: 50051 }],
  logging: new AwsLogDriver({ streamPrefix: "HostedWhisperStreaming" }),
});

this.ecsService = new Ec2Service(this, "ECSService", {
  cluster: cluster,
  taskDefinition: taskDefinition,
  capacityProviderStrategies: [
    { capacityProvider: capacityProvider.capacityProviderName, weight: 1 },
  ],
});
Next we configure the Task Definition that will use the included Docker container image.
Docker Image
FROM --platform=linux/amd64 nvidia/cuda:12.2.2-cudnn8-runtime-ubuntu22.04 AS base

RUN apt-get update && apt-get install -y --no-install-recommends \
    python3 python3.10-dev python3-pip python3.10-venv libsndfile1 build-essential curl git  && \
    rm -rf /var/lib/apt/lists/*

FROM base AS builder

COPY src/requirements.txt ./

RUN pip3 install --upgrade pip setuptools wheel && \
    pip3 install --user -r requirements.txt && \
    pip3 install --user git+https://github.com/openai/whisper.git

FROM base
ENV MODEL=${MODEL}
ENV LOG_LEVEL=${LOG_LEVEL}

COPY --from=builder /root/.local /root/.local
COPY src/* ./
RUN chmod +x /entrypoint.sh

EXPOSE 50051

ENTRYPOINT ["/entrypoint.sh"]
The Dockerfile included creates a Docker image that uses the nvidia/cuda Docker image as the base. This image will allow us to use the GPUs on the EC2 instance.
The pip3 install commands are particularly important when using this image. These will update and install the necessary tools to install and configure Whisper. In order to ensure the model is downloaded and installed, python3 -c "import whisper; whisper.load_model('base')" is run as part of the build.
As part of the entrypoint.sh script, we will be sure to set the correct path for the cuDNN libraries.
export LD_LIBRARY_PATH=`python3 -c 'import os; import nvidia.cublas.lib; import nvidia.cudnn.lib; print(os.path.dirname(nvidia.cublas.lib.__file__) + ":" + os.path.dirname(nvidia.cudnn.lib.__file__))'`
This solves the Could not load library libcudnn_ops_infer.so.8. Error: libcudnn_ops_infer.so.8: cannot open shared object file: No such file or directory issue that is caused by the LD_LIBRARY_PATH not containing the correct locations for the libraries.
Finally, we will start the server.
python3 server.py
Whisper Server
The server starts with two Servicers - AudioTranscriberServicer and HealthCheckServicer. The HealthCheckServicer is used to validate to the Application Load Balancer
def serve():
    server = grpc.server(futures.ThreadPoolExecutor(max_workers=10))
    audio_transcriber_pb2_grpc.add_AudioTranscriberServiceServicer_to_server(
        AudioTranscriberServicer(), server
    )
    audio_transcriber_pb2_grpc.add_HealthCheckServiceServicer_to_server(
        HealthCheckServicer(), server
    )
    server.add_insecure_port("[::]:50051")
    server.start()
    logger.info("Server started. Listening on port 50051.")
    server.wait_for_termination()
The AudioTranscriberServicer will be used to process the audio stream and return the transcriptions to the gRPC client. Whisper does not natively support streaming audio, so we must break the streamed audio into chunks that Whisper can use. To do this, audio processor will process the audio frames and use VAD to detect speech segments. These frames are buffered until a non-speech frame is encountered. When this happens, the frames are joined into a chunk. If the chunk is long enough, it is processed by faster-whisper using the large-v2 model. This allows for rapid transcription of streaming audio while allowing Whisper to provide the best results.
Notes and Warnings
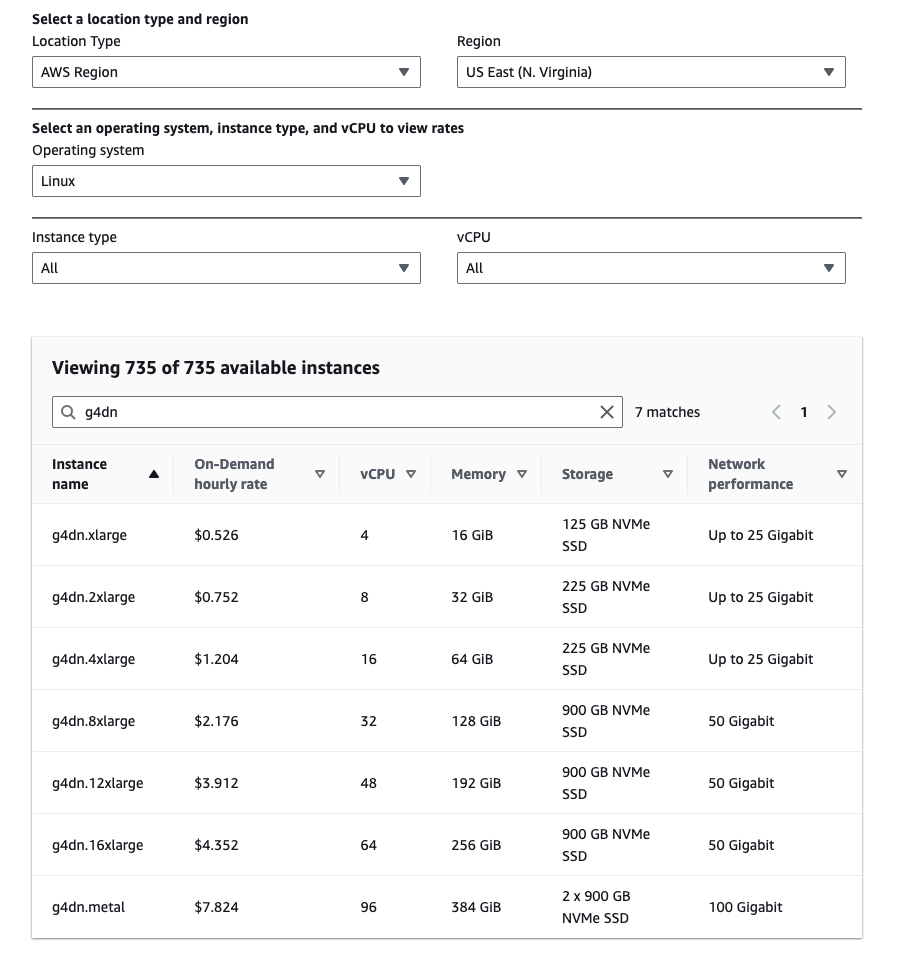
Because this deployment uses GPU based instance(s), be sure to check the prices of the instances that will be used.
Testing
This demo requires a domain hosted in Route 53 so that a certificate can be associated with the Application Load Balancer listener. To configure the domain within the deployment, create a .env file with a DOMAIN_NAME= associated with a Hosted Zone Name in the account.
Once the .env has been configured, you can deploy the CDK from the cloned repo:
yarn deploy
After deploying the CDK, you can test the functionality by running the included client. This client will capture audio from your microphone and stream it to the server using gRPC. Output from the CDK will be used to configure the client in the /client/.env file. To run the client:
cd client
yarn build
yarn start
Cleanup
In order to delete this CDK, you should remove the Auto Scaling Group first. Once that is done, you can delete the Stack from Cloudformation.